
Digital Accessibility Guide for Instructors
Welcome!
At the University of Maryland, we're committed to ensuring that our digital learning spaces are inclusive and welcoming for all. Accessibility isn't just a checkbox; it's a mindset and a practice that helps every student succeed. This guide is here to make your journey into digital accessibility simple, clear, and empowering.
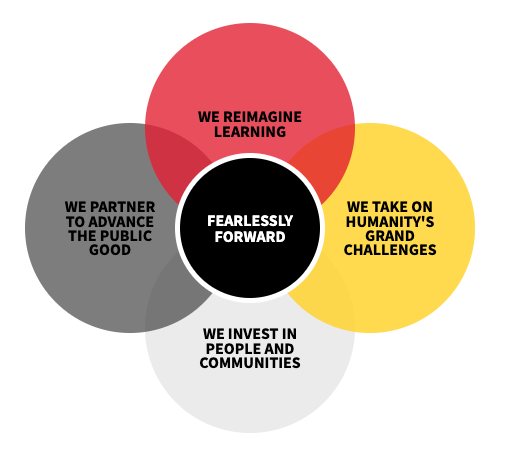
"We reimagine learning and teaching as inclusive, experiential, publicly engaged, creative, integrative, holistic, and empowering. We must lead in the development of innovative and inclusive approaches for teaching and learning, and expand accessibility of our educational programs through equitable, flexible, inclusive approaches to instructional design and delivery." — UMD Strategic Plan: We Reimagine Learning
This Digital Accessibility Guide for Instructors is designed to support you in bringing that vision to life. Inside, you’ll find:
- The fundamentals of digital accessibility requirements when designing your courses.
- Practical best practices and strategies for creating inclusive content.
- Resources to help you strengthen accessibility in your teaching.
Download an accessible Word or PDF version of our Digital Accessibility Guide for Instructors.
Digital Accessibility is a Journey
 Creating inclusive digital learning environments is an ongoing process. While this guide provides a strong foundation, accessibility requires continuous learning and practice to keep pace with evolving standards and tools. We encourage you to explore additional opportunities for growth through the UMD Digital Accessibility Training page, where you’ll find upcoming and recorded trainings, presentation slides, and more.
Thank you for taking the first step on this journey! Your commitment to accessibility is also a commitment to excellence in teaching and learning. Remember, every step you take makes a meaningful difference for your students.
What is Digital Accessibility?
Digital accessibility ensures that all students, regardless of ability, can independently access, engage, and interact with your course content. This includes all electronic content hosted in ELMS-Canvas, shared through online documents, or delivered via multimedia tools and external websites.
Digital accessibility is a fundamental component of Universal Design for Learning.
Universal Design for Learning (UDL) is a way to design courses that work for all students by offering choices in how they learn, show what they know, and stay motivated. Instead of using a one-size-fits-all approach, UDL helps instructors create flexible lessons that support different learning styles, needs, and backgrounds. The goal is to make learning more inclusive so every student has a fair chance to succeed (UDL guidelines from CAST).
When adding digital accessibility principles to your course, think of it like adding accessibility features to the physical spaces, such as elevators and curb cuts: just as those features benefit everyone, not only people with disabilities, accessible course materials support all learners by offering more flexible and inclusive options.
Digital accessibility principles must be applied to all online (digital) components of your course, including:
- ELMS-Canvas pages, announcements, assignments, discussion boards, quizzes
- Video and audio content
- Documents (PowerPoint presentations, PDFs, Word documents)
- External websites used as a teaching tool
- Web applications and learning technology tools
Some examples of ensuring digital accessibility in your course include:
- Captioning videos
- Formatting course pages and documents with alternative text for images, descriptive hyperlinks, and sufficient color contrast
- Using eLearning tools and apps that meet accessibility standards
- Providing content in multiple formats, such as video, audio, and text
Watch the video on inclusive web (11min) where students share stories of navigating the Web using a range of technologies, including screen readers, speech recognition, magnification, and mobile devices. The video highlights several components of digital accessibility.
Why is Digital Accessibility Important?
Digital accessibility is a requirement under the Americans with Disabilities Act (ADA) and is reinforced by the University of Maryland’s Accessible Technology Policy. Just as the ADA mandates accessibility in physical spaces, such as classrooms, offices, and sidewalks, it also requires equivalent accessibility in digital spaces, including websites, course materials, and online tools.
The ADA requires that all University web content and mobile applications, including academic course materials, comply with the Web Content Accessibility Guidelines (WCAG). This requirement applies to all digital content, whether public-facing or behind authentication, such as materials housed within ELMS-Canvas.
It is the responsibility of content creators, including faculty, staff, and campus units, to ensure that all digital materials meet established accessibility standards. This includes documents, videos, presentations, websites, and digital tools used for teaching, communication, and administrative functions.
With the new ADA regulations, it is essential for all members of the campus community to take a proactive role in making digital content accessible. Accessibility is not solely the responsibility of the Division of Information Technology (DIT) or Accessibility and Disability Services (ADS). Instead, it requires a collective shift in mindset, everyone who creates, shares, or uses digital content has a part to play in ensuring equal access for all.
As instructors, we rely heavily on digital platforms to deliver our courses. From online content and learning management systems like ELMS-Canvas to digital documents, multimedia resources, and third-party web applications, digital tools are central to how we teach, share materials, communicate with students, and assess their learning.
ADS will continue to provide accommodations for students with disabilities who are registered with their office. We invite you to learn as much as you can about digital accessibility and to implement best practices that improve the accessibility of your courses. Instructors, to the extent possible, should ensure that all course content is accessible from the outset, not only in response to individual accommodation requests.
For instance, all instructional videos need to include captions, regardless of whether a student requiring captions is enrolled. When we proactively design course content such as videos, documents, and course pages following established accessibility guidelines, we create online learning environments that are more flexible, navigable, and responsive to diverse student needs. Designing content with these principles not only removes barriers for students with disabilities but also enhances the overall learning experience by reinforcing comprehension, supporting different learning styles, and making instructional materials more engaging and effective for everyone.
At UMD, core academic technology tools play a vital role in the instructional learning experience for most students and instructors. Each day, over 30,000 students and 2,000 instructors log into ELMS-Canvas, UMD's learning management system. Zoom facilitates video conferencing and recording for more than 3,000 online meetings on weekdays, while UMD community members watch over 1,500 hours of online video lectures through Panopto.
Ensuring that all digital materials are accessible means that every student, regardless of ability, can participate fully and equitably in their academic experience. This includes students with visual, auditory, cognitive, physical, and neurodiverse needs.
Students navigate the online environment in diverse ways, including platforms like ELMS-Canvas, university websites, external learning tools, and web applications, often relying on assistive technologies tailored to their specific needs.
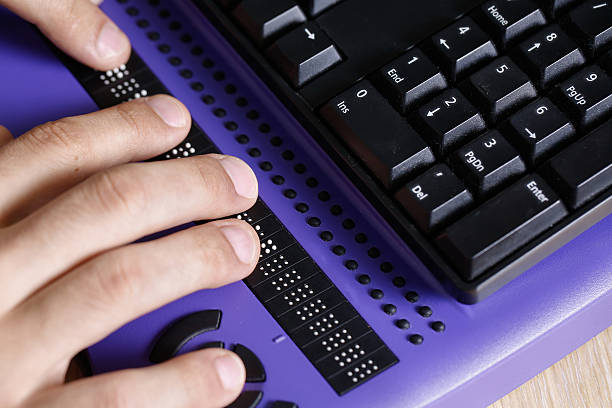
For students who are blind or have significant visual impairments, screen readers such as JAWS, NVDA, or VoiceOver convert digital content into synthesized speech or braille, enabling full access to web-based materials.
Those with low vision may use screen magnifiers like ZoomText or built-in tools to enlarge and enhance the visibility of on-screen elements.

Students with mobility impairments or learning disabilities may depend on speech recognition software, such as Dragon NaturallySpeaking or built-in dictation tools, to navigate the web and complete assignments through voice commands.
Others may use alternative input devices, including sip-and-puff systems, head pointers, or eye-tracking technology, to interact with web content without traditional keyboards or mice, allowing them to participate fully in digital learning environments.
By prioritizing digital accessibility, we not only meet legal standards and institutional policies but also affirm our commitment to equity, academic excellence, and student success. It reflects a proactive approach to inclusion and strengthens the quality and reach of our educational practices.
Start by Using the Six Essential Steps for Digital Accessibility!
Whether you are creating new digital content for your course or using materials that you or someone else previously created, it’s important to ensure that everything you provide is accessible or includes an accessible alternative format.
The Six Essential Steps for Digital Accessibility were developed in alignment with the Web Content Accessibility Guidelines (WCAG) and serve as a guide for applying digital accessibility standards in the six most common areas where accessibility barriers frequently occur.
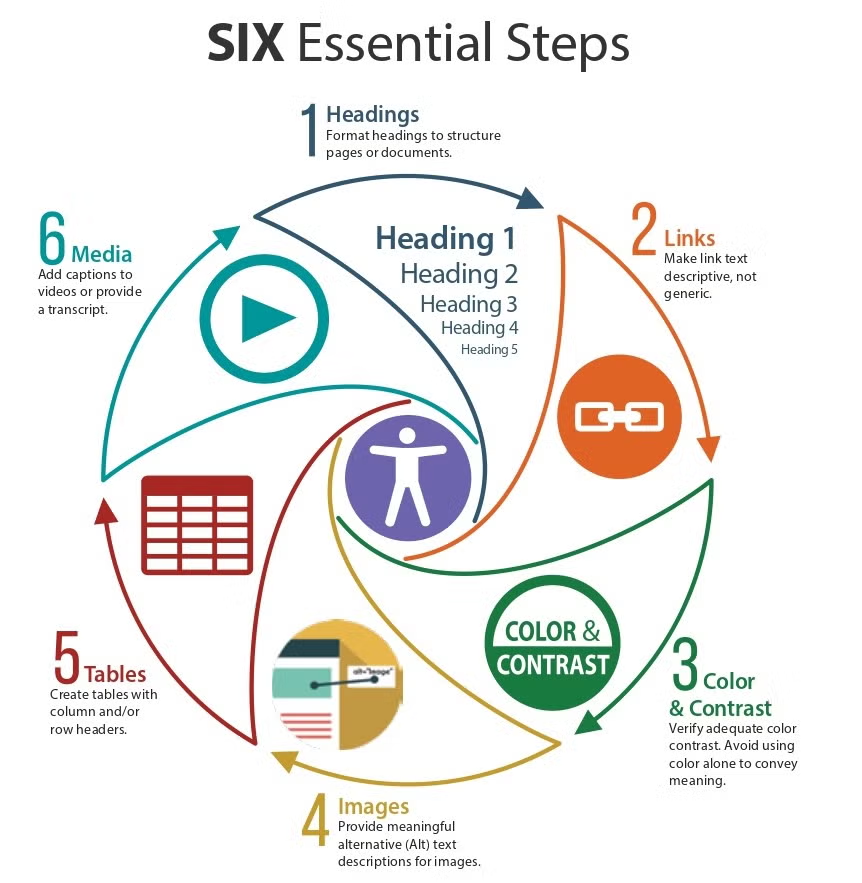
The Six Essential Steps of Digital Accessibility are:
- Headings
- Links
- Color & Contrast
- Images
- Tables
- Media
You may download the DIY Six Essential Steps Poster in PDF format for printing.
By following the Six Essential Steps as you create and revise your digital content, you will address the most critical components of digital accessibility. Be sure to apply these steps whenever you create or edit digital materials, such as presentations, newsletters, documents, emails, web pages, and online readings, as well as when developing content within your ELMS-Canvas courses.
You may expand your knowledge by watching the Six Essential Steps webinar series or participating in one of our webinars.
Digital Accessibility and ELMS-Canvas
As you create and update your ELMS-Canvas course, there are several accessibility checker tools available to alert you to potential issues and guide you through the steps to fix them. We recommend using multiple accessibility checkers to ensure that all digital content is reviewed before publishing your course content. The following accessibility checkers are available in every ELMS-Canvas course.
FIRST: Use the TidyUP tool
If you have reused content or copied your course from previous semesters, use the TidyUP tool before beginning with the accessibility checker tools. TidyUP will help you identify and remove unused documents and pages, streamlining your workflow so that your accessibility efforts focus only on the content that really matters.
Quick guide on how to use TidyUP:
- Enable TidyUP in your Canvas Course: Go to “Settings,” “Navigation,” and Enable TidyUP (and select “Save.”)
- Scan your course with TidyUP.
- Review the Files tab, which identifies all unused files housed within a course. This is determined by whether the file is linked to content within the course being scanned.
- Delete individual unused files by selecting the red “garbage can” icon to the right of the file. (You may also download unused files to save a copy.)
- To delete multiple files, check the grey box to the left of the files.
Note: If you are a new instructor or are teaching a course for the first time, you may not have many files in your course. In that case, you don’t need to use TidyUP.
ELMS-Canvas Accessibility Checkers
Any time you are using the rich content editor in ELMS-Canvas, you will notice the accessibility icon just below the editing window.
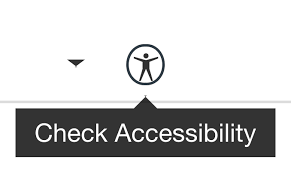
If there is a number next to the icon, that means the built-in Canvas accessibility checker has identified potential accessibility issues. Clicking on the number will take you to the Canvas Accessibility Checker panel.
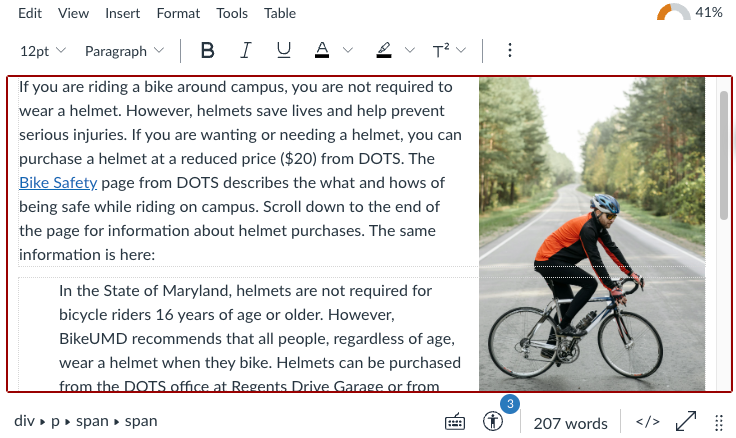
The panel displays issues one by one, with steps to fix issues such as color contrast, heading levels that are out of order, missing alternative text, and more. When you have fixed the issue, the "Apply" button becomes active, and you are taken to the next issue. For more information, see How Do I Use the Accessibility Checker in the Rich Content Editor.
DesignPLUS is an advanced content editor for ELMS-Canvas that lets instructors use design and formatting features without having to know about HTML. You don't need to use DesignPLUS to format your ELMS-Canvas course in order to use the included accessibility checker tool, which is a powerful and easy-to-use option for ensuring the accessibility of your course content. One unique feature of the DesignPLUS accessibility checker is that it also checks math elements on a page to make sure they are accessible to all students.
DesignPLUS is launched by going into Edit mode and then selecting the red "rocket" icon in the upper right corner of your screen. For more information about using the DesignPLUS accessibility checker, see Accessibility and Usability Tools.
Instructor Feedback
Ally integrates with all of your ELMS-Canvas courses and automatically checks your course content and uploaded files for any potential accessibility issues. Learn more at Ally: An ELMS-Canvas Accessibility Tool.
Ally has the following features:
- Automatically checks course content and files uploaded and flags any potential accessibility issues.
- Provides a course accessibility report and score.
- Gives feedback and instructions for fixing issues that it has identified.
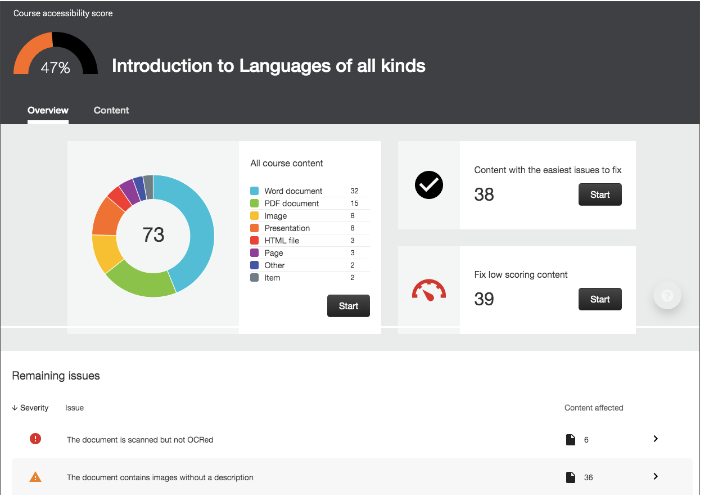
Ally scans your course materials, detecting digital content that is not readable or usable by a student with a disability. Ally then provides feedback and instructions for fixing issues that it has identified. Ally measures the accessibility of each file attached to a course and shows you at-a-glance how it scores. Scores range from Low to Perfect. The higher the score, the fewer the issues.
Ally Course Accessibility Report
The Ally Course Accessibility Report is available by default in the navigation menu of all your courses and is only visible to instructors. The course accessibility report gives instructors more detailed feedback on the accessibility of specific items in their course as well as an overall score for the entire course. The course accessibility report is a good starting point to understand the issues in your course, and then prioritize your own workflow — everyone's process will be different. This report offers an overall accessibility score and guides you to get started by addressing easy-to-fix issues.
Watch the video of Ally Course Report (Canvas) (1:14 min.)
Course Report Dashboard
Ally’s course accessibility report includes Overview and Content tabs so that you can get the big picture as well as specific details about the accessibility of your digital course content.
- The Overview tab shows the course content grouped by content type, and a list of all issues identified in the course
The Content tab shows you the content with accessibility issues, and it can be sorted by name, number of issues, and score.
Your Course Accessibility Score: A Starting Point, Not the Finish Line
At the top of the report, you’ll see the overall accessibility score for the course, along with a visual indicator showing where it stands on the journey to accessibility. The higher the score, the fewer the issues. Remember, this is your baseline, with the goal of improvement from wherever you are starting.
Accessibility is a Journey, Not a Number. Whatever the score is today, the goal is improvement, not reaching 100%. The score is just one simple representation of your course’s accessibility and does not fully account for all content, such as videos or outside resources. Don’t focus too much on the score; instead, focus on making steady progress and meaningful improvements.
All Course Content
The course accessibility report is also a great way to see a record of all your course content, grouped by content type. Instructors are often surprised to see how many files of each content type exist in their ELMS-Canvas course. These details can inform your workflow decisions when you begin working on file accessibility.
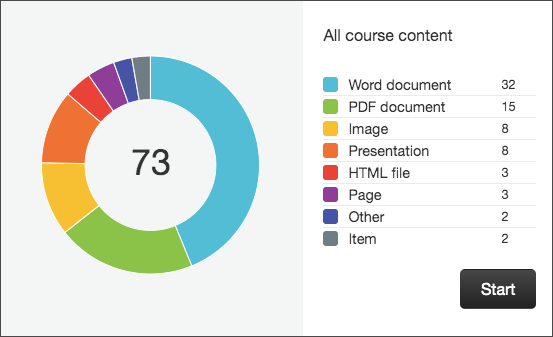
If it seems like there are more Word documents than you remember, for example, you should run the TidyUP tool mentioned earlier to identify and delete unused files that may be impacting your course accessibility score before you begin working on remediating your files.
Alternative Formats for Students
Ally also provides students with accessible alternative formats for documents in your course. Alternative formats increase accessibility for those with disabilities, support diverse learning styles, enhance engagement through interactive materials, and provide flexibility in accessing learning resources and personalized learning experiences.

The Ally Alternative Format icon is visible to instructors and students. Students can download Alternative formats wherever they find the "Download Alternative Formats icon."
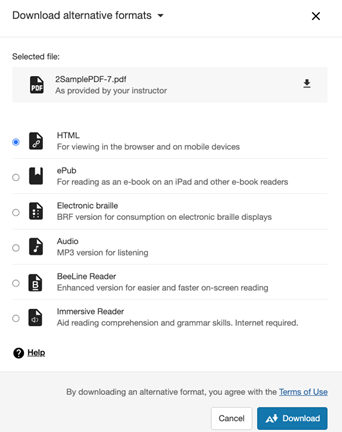
Students can also choose “Alternative Formats” from the download arrow icon for any files you are providing in the course. The file content is the same, but is available to the student in a different, more accessible format:
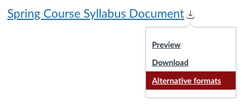
The alternative formats available depend on the original content type. If students don't see an option to download alternative formats, the file is not a supported content type. Alternative format types are listed in the dialog box that appears when the file is a a supported content type:
We suggest using the following language in your course syllabus:
The Ally accessibility tool is available in this course. It allows you to download content in alternative formats that best fit your learning preference. Examples of alternative formats include MP3 (audio file), HTML, ePub, electronic braille, and BeeLine reader. Select the Download Alternative Formats icon to download content in a different format. The alternative format file will be downloaded to your device, and you will be able to access it at any time. Watch the Ally alternative formats video or read the article on Ally Quick Start for students.
Document Accessibility
Providing accessible documents enables individuals with disability to access the content in whatever way works best for them. Tables, headings, color contrast, and images must be properly formatted for users of assistive technology as well as individuals with learning or cognitive disabilities.
Applying the Six Essential Steps for Digital Accessibility concepts to your course documents means your students can experience a barrier-free learning environment.
Document files that were created in another platform will need to be checked for accessibility, and any issues will need to be fixed outside of ELMS-Canvas and uploaded again into your course.
Microsoft Word
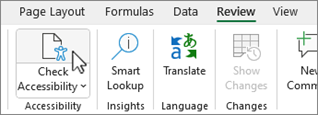
Microsoft includes an accessibility checker for Word, PowerPoint, and Excel spreadsheets.
Learn how to improve accessibility with the Microsoft Accessibility Checker
Google Docs
Although Google does not check for accessibility of Docs, it does provide guidance and steps for "how to" make accessible content, including:
- Adding and editing alt text
- Checking for adequate color contrast
- Using descriptive text for hyperlinks
- Using numbered bullets and lists
- Using headings to organize the document
Although Google does not have a built-in accessibility checker, Grackle Docs is a Google extension that is free to install and will check your Docs for accessibility. Once installed, you can access Grackle Docs from the toolbar under "Extensions."
Fixing image-based PDFs with OCR (optical character recognition) ensures accessibility for people with visual impairments, making text machine-readable for screen readers, text-to-speech tools, and search functions. It also supports users who need to search, highlight, or interact with the document more effectively. This is the easiest type of document to fix and has the highest impact on accessibility.
Step 1: Check If the PDF Is Image-Only
- Try selecting text with your mouse.
- If you cannot highlight individual words or letters, it is likely an image-only PDF.
- You can also confirm this by opening the file in Adobe Acrobat Pro or using Ally in ELMS-Canvas.
Step 2: Run Optical Character Recognition (OCR)
Using Adobe Acrobat Pro (desktop version):
- Open the file in Acrobat Pro.
- Go to Tools > Scan & OCR.
- Click Recognize Text > In This File.
- Choose settings and click Recognize Text to convert the image into selectable, searchable text.
Step 3: Fix Basic Accessibility Issues
After OCR has been applied:
- Use the Tags pane to structure the document with proper headings.
- Add alt text to images (Tools > Accessibility > Set Alternate Text)
- Check the reading order (Tools > Accessibility > Reading Order).
- Save the updated document.
Step 4: Run the Accessibility Checker
- Go to Tools > Accessibility > Full Check.
- Review the report and follow guidance to correct any outstanding issues.
Step 5: Provide an Accessible Alternative if needed
If the PDF cannot be made fully accessible:
- Offer the original Word or Google Doc version.
Or create a summary or retyped version in an accessible format.
PDFs are generally created first in another platform and then exported to PDF. PDF stands for "portable document format," a format originally designed for use in printing rather than reading as an electronic document. Because of this, there can be many reasons why a PDF may not be accessible to assistive technology such as a screen reader. When checking PDFs for accessibility and remediating issues, it's important to remember two points:
- The best way to create an accessible PDF is to start with an accessible original document (e.g., a Word document).
- If a PDF cannot be made accessible, be prepared to offer an alternative format (e.g., the original Word or Google document).
Common accessibility pitfalls that may be found in PDFs include:
- Untagged PDFs.
- PDFs that are scanned images of text rather than text.
- Images within PDFs that have no alternative text.
- PDFs that are tagged, but in the wrong order.
- PDFs where interactive elements (form fields, links, videos, etc.) are not selectable.
Many PDF issues can be resolved by editing the original document, but that may not always be possible. It is always best to test your PDFs before publishing them for use — you can use Ally, Adobe Acrobat Pro, or other tools to evaluate and fix accessibility issues. These programs are especially helpful if you are not the original owner of a document or do not have access to the original copy.
Media Accessibility
All media content in your ELMS-Canvas course must be accessible. This means that every audio or video file you share must include captions, transcripts, and other accessible alternatives to ensure that all students can fully access and engage with the content.
To meet digital accessibility requirements, all pre-recorded video and audio content must include appropriate alternatives to ensure equal access. Specifically, the ADA requires audio descriptions for pre-recorded videos when visual content is necessary to understand the message. While the most effective approach is to plan for accessibility during content creation, you can ensure accessibility of existing media by addressing key elements. Use the guidelines below to ensure your audio and video content is inclusive and compliant.
Podcasts and spoken word audio are popular ways to engage learners. You should always provide a written transcript along with the audio file.
- Provide a transcript for all audio content.
- Let students know that they can download transcripts in Panopto
- A basic transcript is a plain-text version of the spoken content, including relevant non-speech audio (e.g., laughter, music, or sound effects) that is essential for understanding the message.
- Descriptive transcripts may be necessary in specific instances, such as when content is intended for users who are both Deaf and blind, or when key visual information (e.g., demonstrations, diagrams, or facial expressions) is essential to understanding the material. They also benefit users who prefer or require a text-based alternative to multimedia, including those with cognitive disabilities or those using assistive technologies like screen readers or braille displays.
Captions make video content accessible by displaying spoken dialogue and essential non-speech audio (like music, sound effects, or laughter) as on-screen text. Captions are essential for viewers who are deaf or hard of hearing, but also benefit:
- Individuals who process written language better than audio
- Viewers in noisy or silent environments
- Non-native speakers
- Anyone who prefers or needs to read along
There are two main types of captions:
- Closed Captions (CC). These can be turned on or off by the viewer and are supported by most video platforms such as YouTube, Panopto, Kaltura, and Zoom.
- Open Captions. These are always visible and permanently embedded in the video. Viewers cannot disable them. Open captions are useful when playback software doesn't support toggling captions or when captions must remain on-screen at all times.
To meet ADA requirements, captions for pre-recorded videos must be:
- Accurate. All spoken content and important non-verbal sounds must be captured without omissions or errors.
- Synchronized. Captions must appear in time with the spoken words or sounds so users can follow along naturally.
- Complete. Include speaker identification and relevant sound effects when they convey meaning.
- Equivalent. Captions should convey the same information as the audio, including tone and intent.
Automatic Machine Captions Must Be Edited to Meet ADA requirements
When creating accessible video and audio content, it's important to note that automatic captions, such as those generated by platforms like Panopto, YouTube, or Zoom, must be reviewed and edited for accuracy and synchronization to meet ADA accessibility standards. Auto-generated captions often contain errors in spelling, punctuation, speaker identification, and timing, which can create confusion or misrepresent the content.
Panopto:
- Enable automatic machine captioning for your Panopto videos.
- Edit Panopto automatic machine captions.
Youtube
Audio Description (also known as video description) is a spoken narration that describes important visual elements in a video, such as actions, settings, facial expressions, and on-screen text. It is essential for individuals who are blind or have low vision, as well as for anyone who cannot see the video clearly due to screen size, glare, or other visual limitations.
Audio Description ensures that viewers can fully understand the content even when visual cues are not accessible, and it is a required component for certain types of videos under the ADA, when visuals convey information not available in the audio track.
- Review the article on How to Add Audio Descriptions in Panopto.
- Best Practices for Audio Description:
- Script before you record: Plan what visual elements need to be described
- Keep it concise and informative: Describe only essential visual details
- Ensure synchronization: Insert descriptions during natural pauses in dialogue
- Consider professional services when accuracy and legal compliance are critical (e.g., required by a student who is blind)
Third-Party Tools and Mobile Apps Must Meet Accessibility Standards
Instructors are always exploring innovative ways to engage students, often incorporating third-party web tools, mobile applications, and emerging technologies into their courses. While these tools can enhance learning and create dynamic experiences, they are not always designed with accessibility in mind. As a result, students with disabilities may encounter significant barriers, ranging from interactive whiteboards and virtual reality platforms to lab equipment and field experiences.
Because technology is central to teaching and learning, it is essential to evaluate its accessibility before adoption. Platforms that rely heavily on visual interaction, drag-and-drop activities, or rapid real-time updates can pose challenges, especially when they are not compatible with assistive technologies. To support student success and strong learning outcomes, all instructional technologies should undergo an ADA IT compliance review before they are introduced into courses. This process helps identify potential barriers, ensures compliance with legal requirements, and promotes effective learning experiences for all students.
Request an IT ADA compliance review prior Procurement of Technology
An IT ADA compliance review is required before any learning technology, third-party tool, or mobile application can be integrated into ELMS-Canvas. This review ensures that the tool meets university standards for security, privacy, and accessibility. Faculty must initiate this process before adopting a new tool.
To begin the review, email dit-thirdpartyreview@umd.edu with details about the tool and its intended use within the UMD community. If submitted tools are found to be inaccessible, requesting faculty or units must work with the vendor to establish a plan to provide alternative equitable access and specific means of accommodations (e.g., alternative software, formats, testing, etc).
List of Approved ELMS-Canvas Tools
The Division of Information Technology (DIT) maintains a list of third-party tools that have been reviewed and approved for integration with ELMS-Canvas, such as Gradescope, Piazza, Top Hat, and Zoom. Review the full list of Approved Educational Technologies Integrated into ELMS-Canvas.
Additionally, this resource includes a list of tools that have been reviewed and found to be out of compliance with UMD policy. These tools should not be used in your course, as they may create barriers for users with disabilities.
Prioritization: Where Do I Start?
When improving accessibility, it’s important to make a plan and set priorities. Every instructor’s plan will look different, depending on the type of content you use and how your course is structured.
Under the UMD Accessible Technology Policy, instructors are required to provide course content in an accessible format if requested by any student, even if the student is not registered with ADS. Instructors should contact DIT (itaccessibility@umd.edu) or the Teaching and Learning Transformation Center (TLTC) (tltc@umd.edu) for assistance.
Important: Instructors will collaborate with the Accessibility and Disability Service (ADS) to ensure that any course content is remediated into an accessible format when a student with accommodations requires it. ADS will work directly with instructors to support accessibility for students who are registered and approved for accommodations. For assistance, contact ADS at adsfrontdesk@umd.edu or 301-314-7682.
Prioritizing Course and Digital Content
Use the following guidelines to help you determine which courses and materials to address first when improving digital accessibility.
Course Prioritization
When teaching multiple courses, start by building accessibility into any new course. Establishing accessibility from the beginning is always best practice. For existing courses, prioritize those with the greatest institutional and student impact. The following is recommended:
- Open Learning (Public-Facing) Courses. Courses that are freely available to the public or shared broadly should be the top priority.
- High-Enrollment Courses. Courses with a large number of students.
- Major-Required and General Education Courses. These courses are essential for student progression and should be followed closely in priority.
- Fully Online Courses. Online courses rely entirely on digital materials, making accessibility critical.
- Blended and Face-to-Face Courses with Online Content. Focus on portions of these courses that include online components such as course syllabi, lecture slides, videos, and online assignments.
Once these areas are addressed, continue expanding accessibility improvements to all remaining courses and materials.
Content Prioritization
Within each course, prioritize the accessibility of materials using the following approach:
Content that will be reused (new first, then those already in use):
- New or existing course pages, assignments, assessments, discussions, documents, videos, etc.
Core materials students rely on
- Syllabus, assignment guidelines, required readings, required videos, key assignments
Easy-to-fix issues
- Course pages and simple documents you’ve created yourself.
- Use the built-in accessibility checkers in ELMS-Canvas, Word, and Adobe PDF to address common issues, such as the six essential steps: headings, links, images, tables, and color contrast.
- Start with the step that feels easiest for you.
Supplementary materials (used only once or temporary/time-limited content):
- One-time lecture recordings (e.g., Panopto recordings), class-specific slides, classroom notes, in-class polls, and discussion threads limited to a single semester
Optional or enrichment resources are not required for success
- Extra articles, recommended videos, supplemental readings
- Content produced by students
Required and supplemental complex documents and video content
- Examples include PDFs, documents that you do not own, scanned complex documents, or specialized academic materials.
- Expertise in digital accessibility is required to remediate complex content such as math, physics, and chemistry equations, music notation, foreign language text, art and design content, maps, complex graphs, infographics, or scientific images.
Prioritizing Media Accessibility
Captions for new videos that will be reused
- Add captions to new videos at the time of creation.
- Use professional captions or edit machine captions
Captions for already recorded videos that will be reused
- Use professional captions or edit machine captions
- Use automatic machine captions in Panopto or YouTube.
- Test accuracy; if errors are minimal, enable automatic captions for all videos.
Transcripts for videos that will be reused
- Create and save live transcripts of Zoom recordings (webinars, training, etc.)
- Save and edit Zoom transcripts
- Download Panopto transcripts.
Real-time automatic caption for classroom lectures
One-time or supplemental videos
- Use Automatic captions in Panopto or YouTube.
- Test the accuracy of automatic captions; if errors are minimal, enable automatic captions for all videos.
- Edit machine captions in Panopto.
Audio description
- If recording a new video, incorporate a verbal description or narration of visuals provided (describe charts on the board, etc.)
- If presenting a video that was pre-recorded, text descriptions can accompany the video, similar to alternative text.
- If the recording is located in Panopto, manually add Audio Descriptions.
Stay Connected and Request Additional Resources and Support
- Explore our site--continue learning on our Digital Accessibility Training page or check out our other Services and Resources.
- Have specific questions? Reach out to us at itaccessibility@umd.edu for consultations and other training opportunities.
- Looking for further instructor support? Visit the Teaching and Learning Transformation Center and request a consultation with TLTC.
Instructor Checklist | Getting Started
- Understand what digital accessibility is and that digital accessibility is a requirement under the ADA.
- Recognize that accessibility is my responsibility as I am a content creator.
- Recognize that Digital Accessibility is part of excellence in teaching and that it benefits all students, not just those with disabilities.
- Use Headings to organize content semantically.
- Ensure Links are descriptive and meaningful.
- Use sufficient Color & Contrast for readability.
- Include Alternative Text for all images.
- Format Tables properly for screen reader navigation.
- Provide captions/transcripts for Media (video and audio).
- Use the Canvas Accessibility Checker.
- Use DesignPLUS for enhanced accessibility and formatting.
- Review the Ally Accessibility Score for my course.
- Correct accessibility issues flagged by Ally.
- Encourage students to use Ally’s alternative formats.
- Create accessible syllabi and documents in Microsoft Word or Google Docs.
- Review the Ally Accessibility Score for your documents and follow suggestions for improvement.
- Use Microsoft’s Accessibility Checker (Word, PowerPoint, Excel).
- Use Grackle Docs for checking Google Docs accessibility.
- Ensure PDFs are accessible (text-selectable, properly tagged, etc.).
- Run OCR on image-based PDFs.
- Fix PDF accessibility issues using Adobe Acrobat Pro.
- Provide captions for all video content.
- Provide transcripts for all audio content.
- Review and edit auto-captions (e.g., in Panopto or YouTube).
- Include audio descriptions if visual elements are essential.
- Request an IT Compliance Review before using new tools.
- Consult the Approved Tools List from DIT.
- Bookmark the DIT Accessibility Services Site.
- Take additional training and the Digital Accessibility Course available on Open Learning.
- Request a consultation or support from the DIT Accessibility Office at itaccessibility@umd.edu.
Updated October 2025